
Timothy Uhl, Fundy’s own Marketing Director, has been on an incredible journey through Central and South America for the past few months. He’s been photographing all along the way with nothing but his iPhone. The reactions he frequently gets are, “REALLY? You shot these with an iPhone?” Today, he’s peeling back the veil of secrecy to share some tips and tricks to help the casual shooter or the professional extract greater results from their iPhones as well.
1. Google+ Snapseed
First and foremost, the look and feel of my images is provided almost exclusively by Snapseed. It’s not one of the instant one button type filters that just adds a stock effect, though it does have a few. In fact, Snapseed was programmed by the same team that makes professional Photoshop plug-ins that world renown photographers use in Photoshop. It’s robust yet very user friendly. Since every image is different, every image needs different adjustments. Snapseed can quickly and simply compensate for many of the problems the iPhone’s images inherently have. You can adjust sharpness, saturation, white balance, and exposure (via the brightness slider). In addition it can effectively simulate effects like tilt shift and create vignetting that will help you drive the eye toward the chosen focal point of your image.
It’s a free app, available in the app store. Snag a copy.
2. Shoot in HDR
I shoot EVERYTHING in HDR mode on the iPhone. This allows me to shoot sunsets, sunrises and still capture an amazing amount of detail in the shadows and highlights. It’s a setting available in most camera apps, though I mainly shoot with the built-in Apple camera app. Since I shoot mostly non-moving landscape images, this works out well for me. If my shots were moving, HDR wouldn’t be effective or feasible at all.

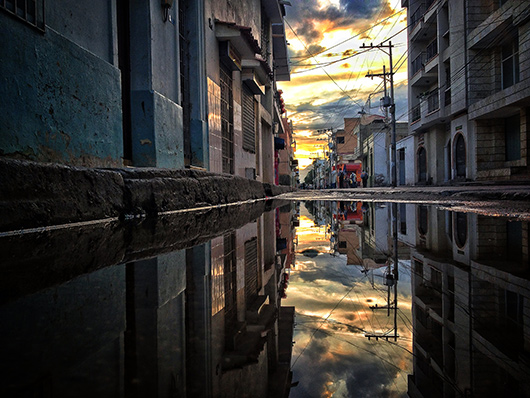
3. Favorable Light
The iPhone doesn’t work well in very low light and doesn’t work well in very bright light with harsh shadows either. So I typically avoid those conditions entirely. Almost all of my images (though not all) are shot in twilight or during sunrise and sunset. This gives me the dramatic skies and warm directional light that makes a two dimensional image have a three dimensional feel. It also helps compensate for the iPhone’s inferior dynamic range because the difference between highlights and shadows is further minimized. It’s a simple recipe, I’m up and out to shoot during those hours. Outside of those hours, I’m doing something else. I’m letting the light do the heavy lifting for me. I’ve got a good friend who shoots nudes and portraits with the iPhone (iPhoneRanger.com) but he still employs good lighting technique to give his shots mood and dimension. Window light, shop lights through a diffused curtain and any other trick a pro uses is also available to the casual iPhone shooter.

4. Basic Exposure Control
Many people don’t know this, but the iPhone allows you some exposure control by tapping on an area of the image. If you tap on a part that’s dark it will brighten it up. If you tap on an area that’s bright it will try to expose for that. When I’m making an exposure, I’m trying to get as much detail as I can in both the brightest and darkest parts of the image. Often my base exposure is a little flat lacking drama, then I use Snapseed to adjust the contrast and exposure to recreate the mood or feeling I saw with my eyes.
5. Composition
The other thing that will help any photographer, with an iPhone or an advanced DSLR is just paying some attention to the basic rules of composition, most of which can be learned very rapidly and applied with deliberate practice. A lot of times as photographers we don’t know what we’re looking for. I always shoot with the composition grid turned on and all of my images employ some combination of the rule of thirds, foreground/background, the use of reflections, references for establishing scale, leading lines, simplicity, silhouettes, uncommon angles, high or low horizons, and so forth. You can google these terms in addition to photography composition ex: photography composition leading lines, for a quick lesson on what they are and how to use them. Knowing these rules gives your eyes something specific to search for when looking for a shot. Give yourself assignments to go out and look for one type of compositional element, employ it a few times and after a few sessions it will become automatic. You’ll start seeing pictures where before you just saw stuff.
6. Editing
Lastly, the pictures I don’t take are just as important to my body of work as the ones that I do. It’s better to have one great shot than five pretty good ones. It’s vitally important for a photographer, or any artist, to be self-critical and realize that not everything they take is going to be worth showing. Rather than giving your viewers the chance to see your mediocre work and label you a mediocre photographer edit for them and make sure they’re only seeing your best. Even the richest prospector will always dig far more rock than gold, but he’d never turn in a piece of quartz and expect someone to buy it. Learn how to spot a gem by studying and analyzing the work of the greats. Only photographers whose work you enjoy and have an affinity for, don’t bother with subject matter you’re not interested in, it won’t inspire you. Over time, you’ll get better at knowing when a shot is worth taking and when one is worth skipping. You’ll know when and where the gold is. :)
You can see more of Tim’s images on Twitter and follow along in his travels and images as they unfold at http://www.twitter.com/timuhl or Instagram at http://www.instagram.com/timothyuhl – Thanks for reading!


